
| 일 | 월 | 화 | 수 | 목 | 금 | 토 |
|---|---|---|---|---|---|---|
| 1 | ||||||
| 2 | 3 | 4 | 5 | 6 | 7 | 8 |
| 9 | 10 | 11 | 12 | 13 | 14 | 15 |
| 16 | 17 | 18 | 19 | 20 | 21 | 22 |
| 23 | 24 | 25 | 26 | 27 | 28 | 29 |
| 30 |
- ListView
- Github
- algorithm
- mysql
- windows
- Process
- commit
- C#
- coding-test
- chashtag
- .net
- Binding
- Visual Studio
- File
- Microsoft
- convert
- dotNET
- log
- logging
- csharp
- WPF
- string
- git
- nullable
- Coding
- 코딩테스트
- tls
- IValueConverter
- programmers
- windows10
- Today
- Total
CHashtag
Docker + ASP.NET core 6.0 + EF Core + Mysql 본문
안녕하세요.
제목이 다소 혼란스러운데요,
마치,, 마라로제떡볶이마냥 .net에 관심이 많은 사람을 쉽게 지나치기 어려운 키워드들만 모아놨으니 말이죠 ㅋㅋ
아무튼 오늘은 Docker + ASP.NET core 6.0 + EF Core + Mysql을 이용해서 간단한 API 서버를 만들어보도록 하겠습니다.
(이 포스팅은 도커 및 asp.net 초심자를 위한 글임을 알려드립니다.)
이 글을 통해서 얻을 수 있는 내용은 아래와 같습니다.
- EntityFramework Core
- Code-First Migration
- Repository Pattern
- Repository Pattern을 사용하는 이유
- Docker
- ASP.NET Core 6
- Route 규칙
- Swagger 연동
- Request & Response
시작하기 전 미리 설치해두어야 하는 툴들은 아래와 같습니다.
- Visual Studio 2022
- ASP.NET 및 웹 개발
- Docker Desktop
- .net 6
- Mysql Workbench (optional)
자 그럼 시작합니다.
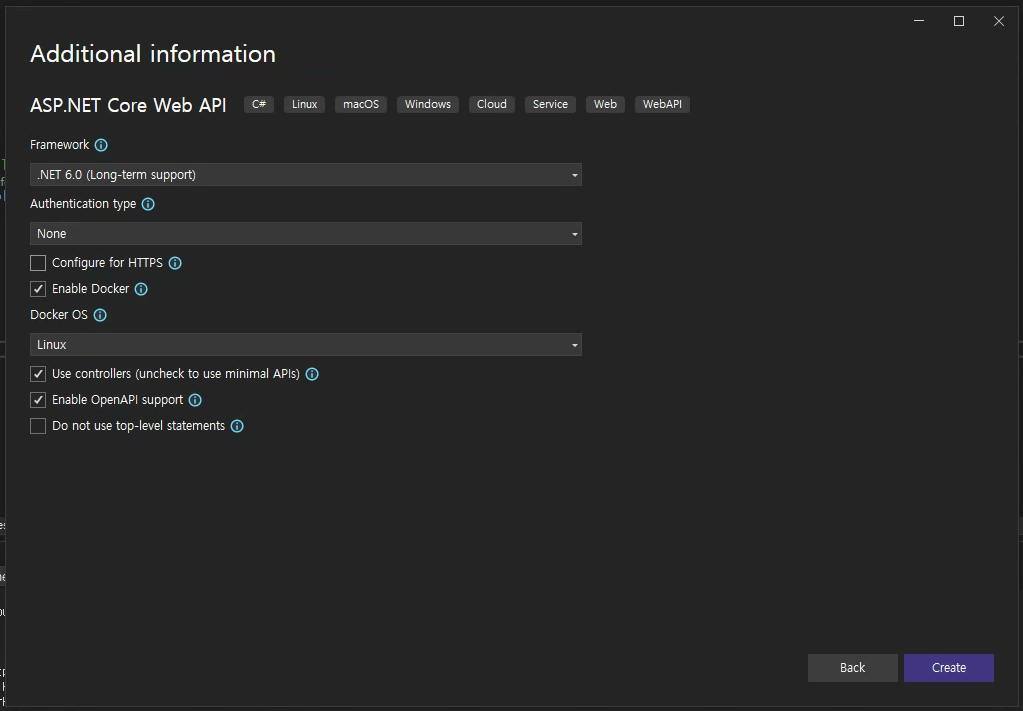
프로젝트 생성
ASP.NET Core Web API를 선택하여 프로젝트를 생성합니다.
(해당 프로젝트 유형이 존재하지 않는다면 Visual Studio Installer를 실행하여 "ASP.NET 및 웹 개발"을 설치해주세요.)

root 폴더 하위의 src폴더에 해당 프로젝트를 생성해주겠습니다.

그 후 폴더구조를 아래와 같이 변경해줍니다.

docker-compose support 추가
visual studio에서는 프로젝트를 docker에 추가하는 것을 돕기 위한 기능을 제공합니다.
(자동으로 docker-compose.yml 파일을 추가해줍니다.)


이렇게 추가하시면 아래와 같이 여러 파일들이 추가된 것을 확인하실 수 있습니다!

Mysql 추가
docker-compose.yml파일에 서비스를 추가해주겠습니다.
아래 내용을 추가해줍니다.
version: '3.4'

services:
  mysql-db:
    image: mysql:8.0
    container_name: mysql-db
    environment:
      MYSQL_DATABASE: product # 사용할 Database 명입니다.
      MYSQL_USER: user1 # 서비스에서 사용할 계정입니다.
      MYSQL_PASSWORD: password1 # 서비스에서 사용할 계정의 비밀번호입니다.
      MYSQL_RANDOM_ROOT_PASSWORD: 1 # root 비밀번호를 랜덤하게 설정합니다.
    ports:
      - 3307:3306 # 내부의 3306 port를 외부의 3307포트와 매핑(포트포워딩)합니다.
    restart: always
  product.api:
    image: ${DOCKER_REGISTRY-}productapi
    build:
      context: .
      dockerfile: Product.API/Dockerfile
    depends_on:
      - mysql-db # 서비스들의 시작과 종료 순서를 제어합니다. (mysql-db가 먼저 켜진 뒤 API 서버가 구동됩니다.)
이 상태로 docker를 실행하면 Mysql이 잘 생성되는 것을 확인하실 수 있습니다.
(docker-compose.yml 파일이 존재하는 경로에서 실행하셔야 합니다.)
cd src
docker-compose up --build
이때 아래와 같은 에러가 뜬다면 당황하지 마시고 docker-compose.yml 파일의 인코딩 옵션을 utf-8로 변경해주시면 됩니다. (혹은 한글 주석을 제거하셔도 됩니다.)
ERROR: .UnicodeDecodeError: 'utf-8' codec can't decode byte 0xbb in position 144: invalid start byte
실행하니 Docker Desktop에서 두 개의 Container가 잘 추가되고 실행 중인 것을 확인하실 수 있습니다.
(아직 asp.net core server는 정상 동작하지 않습니다.)

그럼 이제 추가한 계정으로 접속이 잘 되는지 Mysql Workbench로 확인해 보겠습니다.
Port와 Username을 아까 입력한 값으로 잘 넣어주고, Connection을 확인해봅니다.


접속이 잘 되고 product database도 잘 추가된 것을 확인할 수 있습니다.

Mysql과 API 서버 연결하기
이 예제에서는 Repository Pattern 및 Code-First Migration을 이용하여 Mysql과의 연결을 진행합니다.
우선 아래 Package들을 다운로드해줍니다. (혹시 몰라 버전도 함께 적어둡니다.)
Install-Package Microsoft.EntityFrameworkCore -Version 6.0.9
Install-Package Pomelo.EntityFrameworkCore.MySql 6.0.2
Install-Package Microsoft.EntityFrameworkCore.Tools 6.0.9
Connection String 추가
# appsettings.json
{
  ...
  "ConnectionStrings": {
    "mysqlConnectionString": "server=mysql-db,3307;user=user1;password=password1;database=product;"
  }
}
Model 생성하기
// Models\Product.cs

using System.ComponentModel.DataAnnotations;
using System.ComponentModel.DataAnnotations.Schema;

namespace Product.API.Models
{
    [Table("product")]
    public class Product
    {
        [Column("name"), Required, StringLength(50)]
        public string Name { get; set; }

        [Column("code"), Key]
        public Guid Code { get; set; }

        [Column("price"), Required]
        public double Price { get; set; }

        [Column("summary"), StringLength(200)]
        public  string Summary { get; set; }
    }
}
Context 추가
// Infrastructure\ProductContext.cs

using Microsoft.EntityFrameworkCore;

namespace Product.API.Infrastructure
{
    public class ProductContext : DbContext
    {
        public ProductContext(DbContextOptions<ProductContext> options) : base(options)
        {
        }

        public DbSet<Models.Product> products { get; set; }
    }
}
Repository 추가
repository는 우선 기본 기능만 구현해 두겠습니다.
상세한 구현은 Controller구현시에 함께 구현하도록 하겠습니다.
// Infrastructure\Repositories\ProductRepository.cs

using Product.API.Infrastructure;

namespace CLO_PHONEBOOK.Infrastructure.Repository
{
    public class ProductRepository : IDisposable
    {
        private readonly ProductContext _context;

        public ProductRepository(ProductContext context)
        {
            _context = context ?? throw new ArgumentNullException(nameof(context));
        }

        public void Save()
        {
            _context.SaveChanges();
        }

        private bool disposed = false;

        protected virtual void Dispose(bool disposing)
        {
            if (!this.disposed)
            {
                if (disposing)
                {
                    _context.Dispose();
                }
            }
            this.disposed = true;
        }

        public void Dispose()
        {
            Dispose(true);
            GC.SuppressFinalize(this);
        }
    }
}
DbContext 등록하기
이제 만들어둔 Context 및 Repository를 ASP.NET Core에 추가해주도록 하겠습니다. (Dependency injection)
ASP.NET Core 6.0에서는 Startup.cs를 사용하지 않으니 Program.cs에 바로 추가해주시면 됩니다.
// Program.cs

using Microsoft.EntityFrameworkCore;
using Product.API.Infrastructure;

var builder = WebApplication.CreateBuilder(args);

var serverVersion = new MySqlServerVersion(new Version(8, 0));

builder.Services.AddDbContext<ProductContext>(options => options.UseMySql(builder.Configuration.GetConnectionString("mysqlConnectionString"), serverVersion));

builder.Services.AddScoped<ProductRepository>();

...
Code-First Migration 제작하기
Package Manager Console에서 아래 명령어를 실행해줍니다.
Add-Migration -p Product.API -o Infrastructure\Migrations InitialMigration그럼 Infrastructure\Migrations 폴더 아래에 파일 2개가 생기는 것을 확인할 수 있습니다.
Migration Code는 Up, Down으로 이루어져있는데, 이 내용들을 가지고 데이터베이스 마이그레이션을 진행하는 것입니다.
(자세한 내용은 다루지 않겠습니다.)

Code Migration진행하기
이제 Migration 코드도 제작했고, Mysql에 Migration을 실행하기만 하면 됩니다!
이 게시글에서는 웹 서버 시작 지점에서(Program.cs) Migration을 진행하는 방법에 대해 알아보겠습니다.
마이그레이션 자동 적용은 DB 데이터 손실을 초래할 수 있습니다.
특히 다중 웹서버 환경에서 Migration을 진행하실 때에는 여러 서버가 동시에 Migration을 진행하지 않도록 각별히 주의하셔야 합니다.
// Program.cs

...

var builder = WebApplication.CreateBuilder(args);

...

var app = builder.Build();

using (var scope = app.Services.CreateScope())
{
    var services = scope.ServiceProvider;

    var context = services.GetRequiredService<ProductContext>();

    // docker depends_on옵션이 절대적으로 우선실행을 보장하지 않는다.
    // 따라서 mysql이 구동되지 않았을 때 먼저 서버가 구동되는 상황이 발생하여 Retry하도록 함
    var needMigration = Retry.Do(() => context.Database.GetPendingMigrations().Any(), TimeSpan.FromSeconds(5));
    if (needMigration)
    {
        context.Database.Migrate();
    }
}
여기서 중요한 부분은 바로 Retry입니다.
분명 docker-compose 파일에서 depends_on을 지정하여 부팅 순서를 명시적으로 지정해 줬었는데요,
그러나 그건 부팅 요청 순서일 뿐 각각의 서비스들이 부팅이 완전히 완료된 후에 다음 서비스가 시작되는 것은 아니기 때문입니다.
Retry.cs
namespace Product.API.Utils
{
    public static class Retry
    {
        public static void Do(
            Action action,
            TimeSpan retryInterval,
            int maxAttemptCount = 3)
        {
            Do<object>(() =>
            {
                action();
                return null;
            }, retryInterval, maxAttemptCount);
        }

        public static T Do<T>(
            Func<T> action,
            TimeSpan retryInterval,
            int maxAttemptCount = 3)
        {
            var exceptions = new List<Exception>();

            for (int attempted = 0; attempted < maxAttemptCount; attempted++)
            {
                try
                {
                    if (attempted > 0)
                    {
                        Thread.Sleep(retryInterval);
                    }
                    return action();
                }
                catch (Exception ex)
                {
                    exceptions.Add(ex);
                }
            }
            throw new AggregateException(exceptions);
        }
    }
}
Controller 구현하기
거의 다 왔습니다.
이제 API Server에서 가장 중요한 API를 제작해보겠습니다.
우선 뼈대만 만들어둔 Repository에 필요한 기능들을 먼저 추가해주겠습니다.
// Infrastructure\Repositories\ProductRepository.cs

using Product.API.Infrastructure;

namespace CLO_PHONEBOOK.Infrastructure.Repository
{
    public class ProductRepository : IDisposable
    {
        ...

        public IEnumerable<Product.API.Models.Product> GetProducts()
        {
            return _context.products.ToList();
        }

        public void InsertEmployee(Product.API.Models.Product product, bool save = false)
        {
            _context.products.Add(product);

            if (save)
            {
                Save();
            }
        }

        ...
    }
}
// Controllers\ProductController.cs
using CLO_PHONEBOOK.Infrastructure.Repository;
using Microsoft.AspNetCore.Mvc;
using System.Net;
namespace Product.API.Controllers
{
[ApiController]
[Route("api/[controller]")]
public class ProductController : ControllerBase
{
private readonly ProductRepository _productRepository;
public ProductController(ProductRepository productRepository)
{
_productRepository = productRepository;
}
[HttpGet]
[ProducesResponseType(typeof(IEnumerable<Models.Product>), (int)HttpStatusCode.OK)]
[ProducesResponseType(typeof(void), (int)HttpStatusCode.NoContent)]
public ActionResult<IEnumerable<Models.Product>> Get()
{
return Ok(_productRepository.GetProducts());
}
[HttpPost]
[ProducesResponseType((int)HttpStatusCode.Created)]
[ProducesResponseType((int)HttpStatusCode.BadRequest)]
[Consumes("application/json")]
public async Task<ActionResult<Guid>> Add([FromBody] Models.Product product)
{
try
{
if(product.Code == Guid.Empty)
{
product.Code = Guid.NewGuid();
}
_productRepository.InsertEmployee(product, true);
return CreatedAtAction(null, product.Code);
}
catch (Exception exc)
{
return BadRequest(exc.Message);
}
}
}
}네 이렇게 모든 구현이 끝났습니다.
프로젝트를 실행해보시면 두 API가 작동하는 것을 확인하실 수 있습니다!!
GlobalUsing 적용
정말 마지막으로, 지금까지 각종 cs파일들에 추가된 using들을 global using으로 바꿔주도록 하겠습니다.
(자세한 내용은 아래 링크를 참고해주세요.)
Add GlobalUsings.cs · Hyo-Seong/docker-with-aspdotnet6-tutorial@49de4b3
Show file tree Showing 9 changed files with 16 additions and 30 deletions.
github.com
네 이렇게 각종 핫한 기술들을 간단히 체험해보았습니다.
진행한 프로젝트의 전체 코드는 아래 Github에서 확인 가능하니 참고 바랍니다.
https://github.com/Hyo-Seong/docker-with-aspdotnet6-tutorial
GitHub - Hyo-Seong/docker-with-aspdotnet6-tutorial: Docker를 이용하여 asp.net 6 개발환경 구성하기 (with. Entity Fra
Docker를 이용하여 asp.net 6 개발환경 구성하기 (with. Entity Framework Core) - GitHub - Hyo-Seong/docker-with-aspdotnet6-tutorial: Docker를 이용하여 asp.net 6 개발환경 구성하기 (with. Entity Framework Core)
github.com
오늘도 긴 글 읽어주셔서 감사합니다.
도움이 되었길 바랍니다.
'C# > ASP.NET' 카테고리의 다른 글
| Memory Leak 분석 1 - 들어가기 앞서,, (0) | 2025.03.03 |
|---|---|
| asp.net DI의 life cycle (Singleton, Scope, Transient) (0) | 2024.05.13 |
| asp.net core에서 swagger 직접 세팅하기 (0) | 2023.02.20 |
| [.net] gRPC 개발 (2) | 2022.01.08 |
| [C#] [ASP.NET] Nancy CS0234, CS0012 어셈블리 참조 에러 해결법 (0) | 2021.05.11 |
